React
demo 地址
React 的世界里一切皆是组件,我们使用 class 语法构建一个最基本的组件,组件的使用方式和 HTML 相同,组件的 render 函数返回页面渲染的一个 JSX,然后使用 ReactDom 渲染到页面里
React 和 Vue 的对比
组件化方面
- 模块化: 从代码的角度进行分析,把一些可复用的代码抽离成单个模块,便于项目维护和开发;如 Node
- 组件化:从 UI 界面角度进行分析,把一些可复用的 UI 元素,抽离为单独的组件。
- Vue 如何实现组件化:
.vue文件- template 结构
- script 行为
- style 样式
- React 如何实现组件化:一切以 js 来表现。ES6、ES7(async 和 await…)
移动 APP 开发体验方面
- VUE 是 结合 Week(阿里)
- React, 结合 ReactNative
几个核心概念
虚拟 DOM
为了实现 DOM 元素的高效更新,性能问题,频繁操作 DOM
需要按需渲染,
获取内存中的新旧 DOM 树,对比,按需更新 DOM,浏览器中并无直接提供获取 DOM 树的 API,因此 用 js 对象模拟新旧 DOM 树的虚拟 DOM 出现了。
DIFF 算法
新旧 DOM 树的对比
- tree diff: 新旧两颗 DOM 树,逐层对比的过程
- Component diff:在进行 tree diff 过程中,每一层中 组件级别的对比。
- Element diff :在进行 component diff 过程中,如果两个组件类型相同,则进行元素级别的对比。
实践步骤:
webpack4.x 和 3 的简述差别
约定大于配置,如 约定的入口路径是 src -> index.js,不用再写 entry 字段
新增 mode 值
项目实践流程
npm init -y建目录 src 和 dist
安装 webpack4 及相关
npm i webpack webpack-cli -Dnpm i webpack-dev-server -D新建
webpack.config.js,配置
安装 react
npm i react react-dom -Sreact 包是专门用来创建组件和 js 虚拟 DOM 的,同时组件的生命周期都在这个包里
React-dom 是 专门进行 DOM 渲染和操作的,最主要的应用场景是
ReactDOM.render()在
index.html中 创建容器以供入口 js 调用 render<div id="app"></div>导入包 在入口文件
index.jsimport React from "react"; import ReactDom from "react-dom"; // 创建虚拟DOM元素 const myDiv = React.createElement( "div", { id: "xx", style: { display: "block" } }, "哈哈哈", React.createElement("p", {}, "2") ); // const myDiv = <div id="d1">第一个div元素</div>; // 使用ReactDom 吧虚拟DOM渲染到页面上 // 参数1 要渲染的那个虚拟DOM元素 // 参数2 指定页面上的一个DOM容器 ReactDom.render(myDiv, document.getElementById("app"));
安装
babel插件npm i babel-core babel-loader babel-plugin-transform-runtime -D语法包
npm i babel-preset-env babel-preset-stage-0 -D能够识别转换 jsx 的语法包
npm i babel-preset-react -DWebpack.config.js中配置 babel-loader配置
.babelrc配置文件
"presets": ["env","stage-0","react"],
"plugins": []
JSX 语法
jsx 语法的本质:并不是直接把 jsx 渲染到页面上,而是内部先转换成了 createElement 形式,再渲染的
jsx 中混合写入 js 表达式:在 jsx 语法中把 js 代码写在
{}中包括:渲染数字、字符串、布尔值、为属性绑定值、渲染 jsx 元素、渲染 jsx 元素数组、将普通字符数组转为 jsx 数组并渲染到页面上
注释
标签必须成堆出现,如果是单标签,则必须自闭合
在 jsx 中创建 DOM 的时候,所有的节点,必须有唯一的跟元素进行包裹
特殊的属性,使用
className来代替class,htmlFor代替 label 的for属性标签上写 style 的话,要用 js 对象
css 模块化
npm i style-loader css-loader -D;配置 webpack.config.js 的 rules
 // webpack.config.js
 {
      test: /\.scss$/,
      use: ['style-loader', {
          loader: 'css-loader',
          options: {
              modules: {
                  localIdentName: '[path][name]-[local]-[hash:5]'
              },
              sourceMap: true
          }
      }, 'sass-loader']
  },
组件中
import cssobj from './demoStyle.css'给 css 模块化
use['css-loader?modules'],但是模块化只针对.class 和#id 选择器,不会将标签选择器模块化给 css 自定义生成类名格式
use['css-loader?localIdentName=[path][name][local][hash:6]']其可选参数是:
- [path]表示样式表相对于项目根目录所在路径
- [name]表示样式表文件名称
- [local]表示样式的类名定义名称
- [hash:length]表示最多 32 位的 hash 值
css 可选
:local()(开启 modules 之后默认 不用写)或者全局:global(.xxclass)(不会被模块化)对于第三方的样式表,规定都以.css 结尾,这样的话 我们不会为普通的.css 启用模块化 直接 import ‘bootstrap’就好,自己的样式表都以.scss 或.less 结尾,于是 只为
.scss或.less文件启用模块化安装
npm i sass-loader node-sass -D绑定事件
事件绑定机制,相对于原生,是小驼峰命名,事件值必须是函数button onClick={function(){}}>按钮</button><button className="Btn" onClick={() => this.myClickFn()}>点击</button>
组件 - 创建组件的两种方式
- 父组件向子组件传递数据
- 使用{…obj}属性扩散传递数据
- 注意:组件的名称必须是大写
- 将组件封装到单独的文件中
- 引入时省略
.jsx后缀名
函数式组件 - 使用构造函数创建组件
没有 state 状态,可以使用 Hooks
如果要接受外间传递的数据,需要在构造函数的参数列表中使用 props 来接收
必须向外 return 一个合法的 jsx 创建的虚拟 dom(React 元素)import React, { useState, useEffect } from "react"; export default function FunctionComponent(props) { const [date, setDate] = useState(new Date()); useEffect(() => { //相当于componentDidMount、componentWillUnmount、componentDidUpdate的集合 const timer = setInterval(() => { setDate(new Date()); }, 1000); return () => clearInterval(timer); }, []); return ( <div> <h3>FunctionComponent</h3> <p>{date.toLocaleTimeString()}</p> </div> ); }CLASS 组件 - 使用 class 关键自关键组件
有 state 状态import React, { Component } from "react"; export default class ClassComponent extends Component { constructor(props) { super(props); //存储状态 this.state = { date: new Date(), }; } //组件挂载完成之后执行 componentDidMount() { this.timer = setInterval(() => { //更新state,不能用this.state this.setState({ date: new Date(), }); }, 1000); } //组件卸载之前执行 componentWillUnmount() { clearInterval(this.timer); } render() { const { date } = this.state; return ( <div> <h3>ClassConponent</h3> <p>{date.toLocaleTimeString()}</p> </div> ); } }两者的区别
- class 关键子创建的组件有自己的私有数据和生命周期,但是 function 创建的组件 只有 props,没有自己的私有数据和生命周期
- 用构造函数创建的组件:叫做“无状态组件”,无 state 和生命周期,但是运行效率较高,很少用
- 用 class 关键字创建出来的组件:叫做“有状态组件”
Class 组件
setState
因为 React 是单向绑定 单向数据流(js=>界面例:对于 input,需要三步,1 手动监听 onChange 事件,2 在事件中拿到最新的 e.target.value,3 调用 this.setState({})),如果要为 state 中的数据重新赋值,要用 react 提供的setState(updater, [callback])
将 setState() 视为请求而不是立即更新组件的命令。React 会延迟调用它,然后通过一次传递更新多个组件。React 并不会保证 state 的变更会立即生效。因为他会是将对组件 state 的更改排入队列,并通知 React 需要使用更新后的 state 重新渲染此组件及其子组件。在合成时间和生命周期中是异步的批量更新,在 setTimeout 和原生事件中和回调中是同步的
通常第一个参数 updater 接受对象类型,如需基于之前的 state 来设置当前的 state,请将updater作为函数(state, props) => stateChange,updater 函数中接收的 state 和 props 都保证为最新。updater 的返回值会与 state 进行浅合并。
react 的生命周期
旧的生命周期:
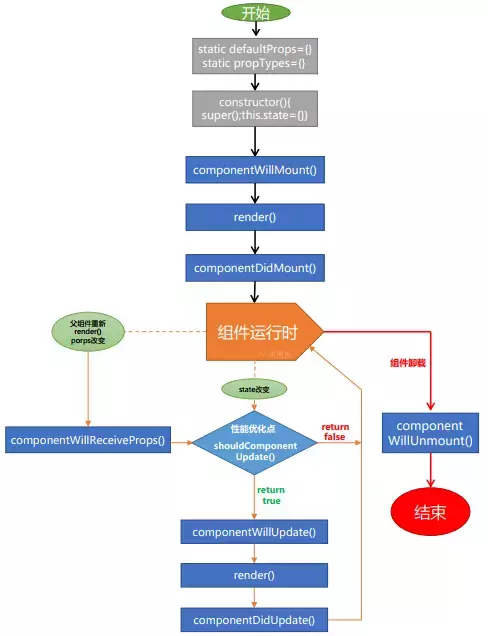
- 组件创建阶段,只执行一次
componentWillMountrendercomponentDidMount
- 组件运行阶段,根据 props 属性或 state 状态数据的改变,有选择的执行 0 到多次
componentWillReceiveProps(nextProps):- 该方法只在 props 引起的组件更新过程中,才会被调用。state 引起的组件更新并不会触发。
- nextProps 是父组件传递给当前组件的新的 props
- nextProps 的值可能与子组件当前 props 的值相同,因此往往需要比较他俩的值来决定是否执行 props 发生变化后的逻辑。
- 在该方法中调用 setState,只有 render 以及之后的方法中。this.state 指向的才是更新后的 state。在之前的 shouldComponentUpdate、componentWillUpdate 中。this.state 指向的还是更新前的 state
shouldComponentUpdatecomponentWillUpdaterendercomponentDidupdate
shouldComponentUpdate 与 componentWillUpdate 中不能调用 this.setState,否则会引起循环调用问题,render 永远无法被调用,组件也永远无法渲染
- 组件销毁阶段,只执行一次
componentWillUnmount
新的 v16.4 之后生命周期
图示来源
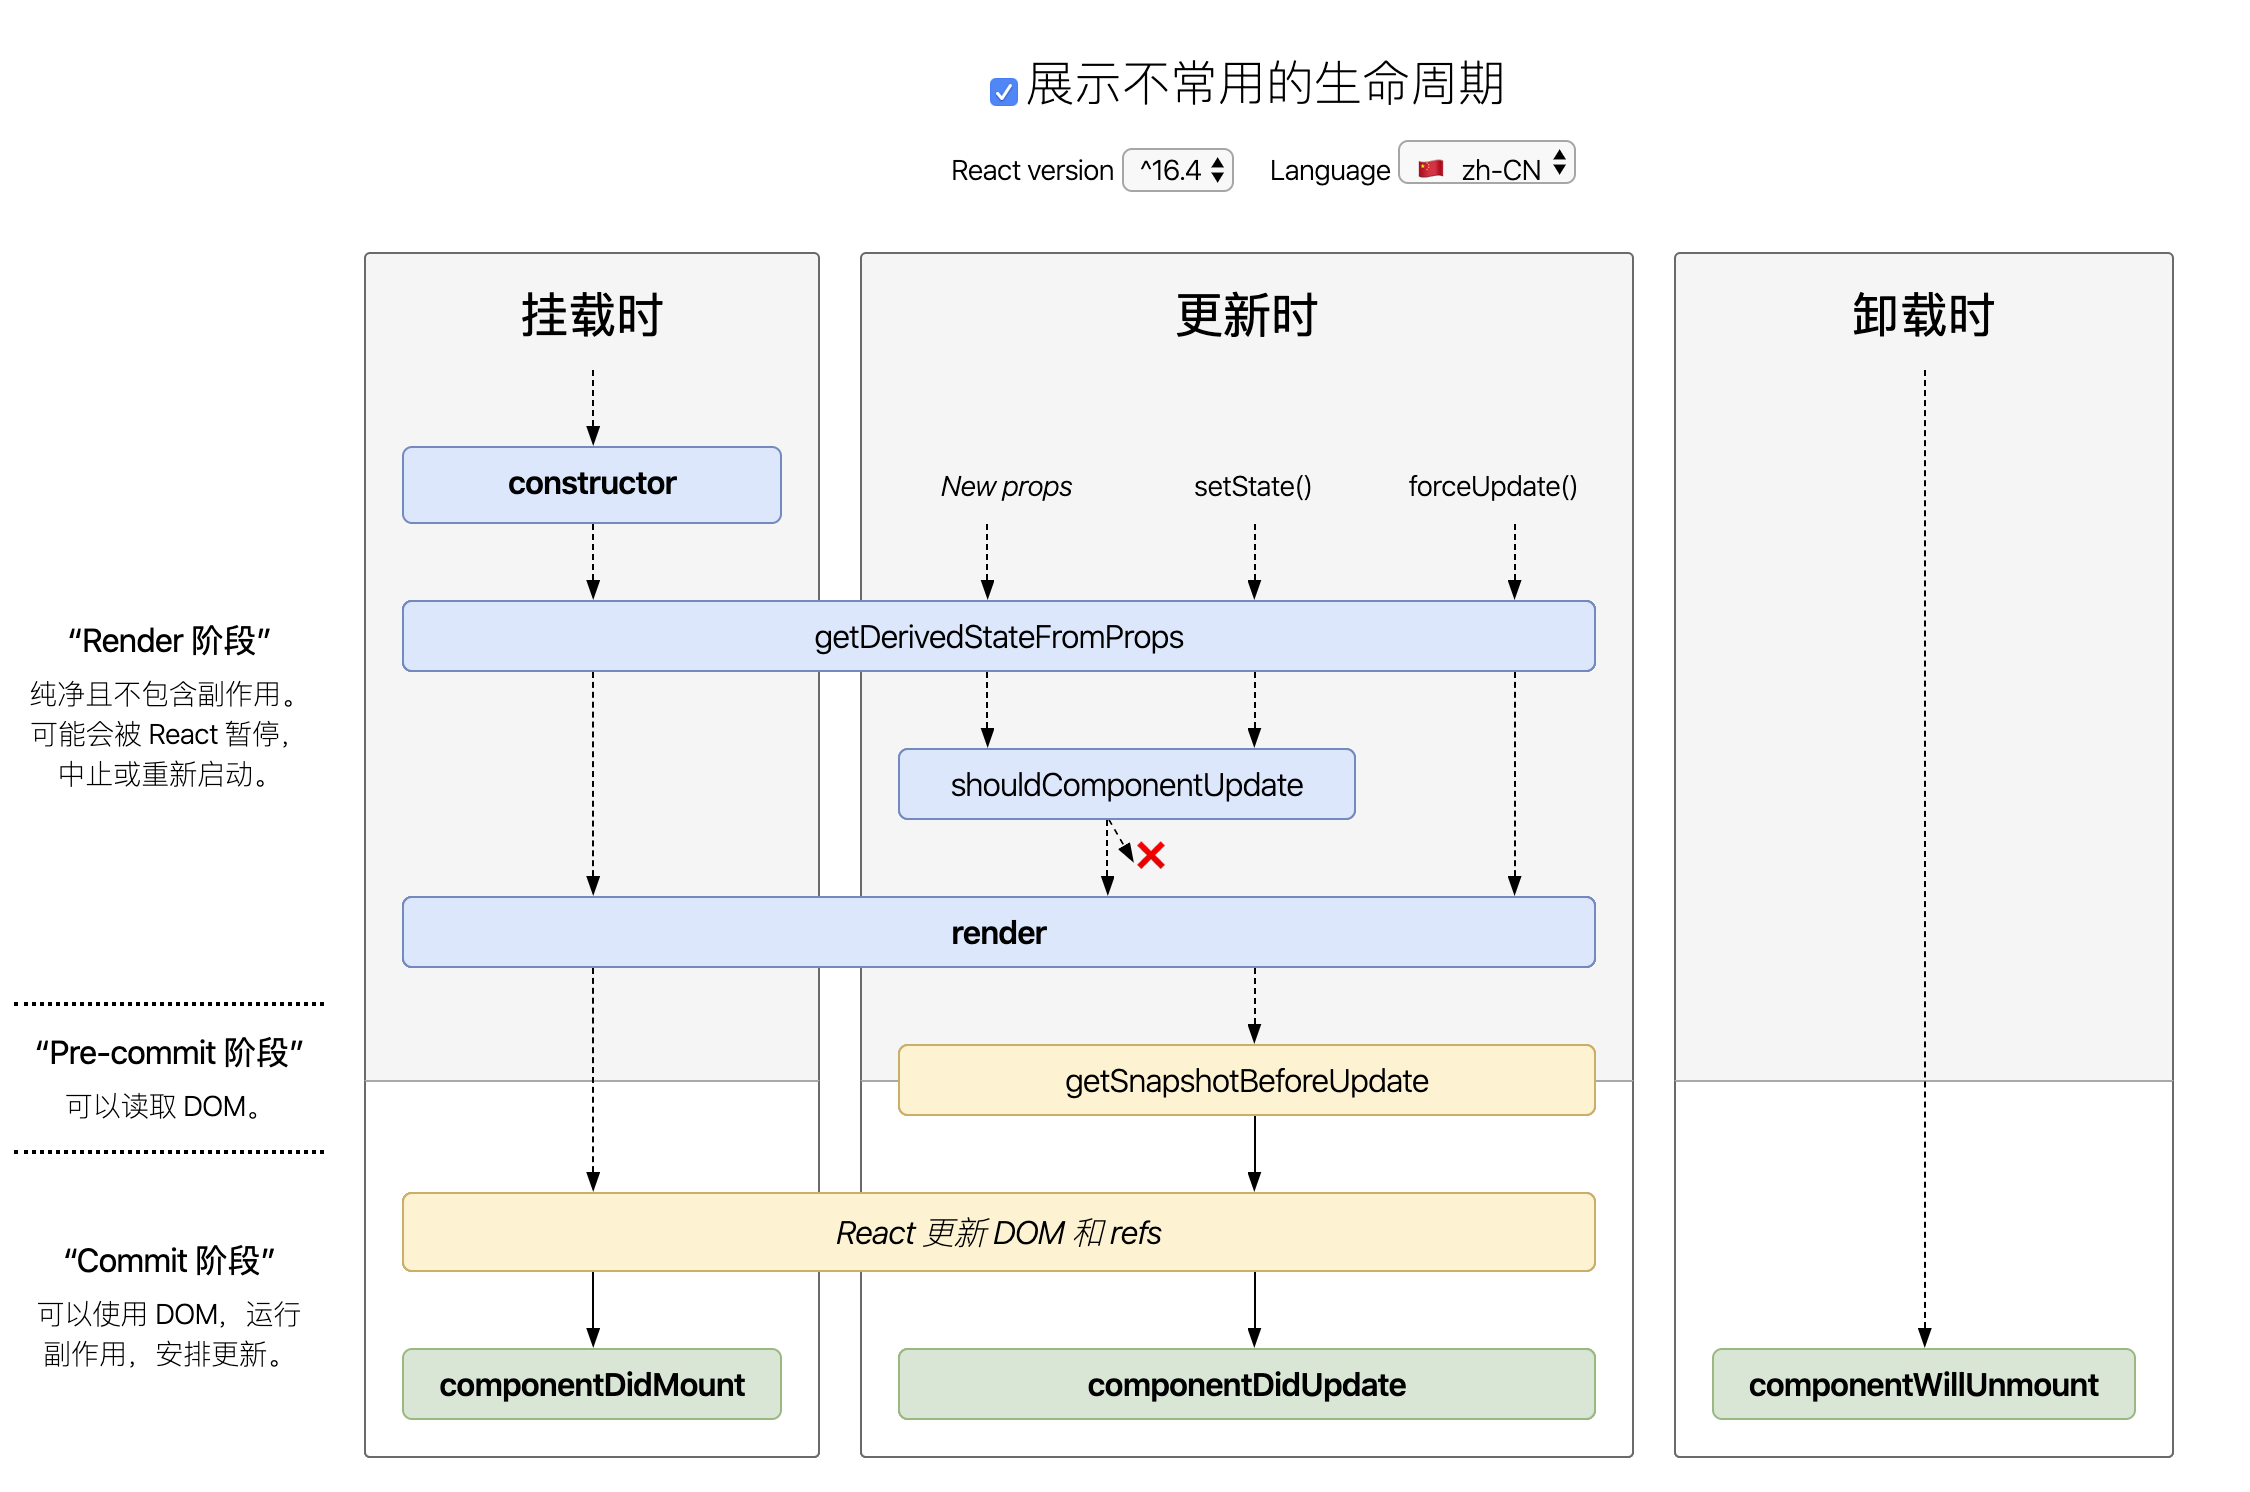
生命周期详解 参考教程
https://www.izhaoo.com/2020/05/17/react-lifecycle/
挂载阶段
constructorstatic getDerivedStateFromProps(props, state)[新增] :- 一个静态方法 基于 props 的派生 state,会在调用 render 方法之前调用,并且在初始挂载及后续更新时都会被调用。它应返回一个对象来更新 state,如果返回 null 则不更新任何内容。不能在此函数里面使用 this,这个函数有两个参数 props 和 state,分别指接收到的新参数和当前的 state 对象
- 此方法适用于罕见的用例,即 state 的值在任何时候都取决于 props。
- 该函数会在挂载时,接收到新的 props,调用了
setState和forceUpdate时被调用,这个方法就是为了取代之前的componentWillMount、componentWillReceiveProps和componentWillUpdate - getDeriveStateFromProps 被设计成一个 static 方法,就是纯粹的获取父组件 props,增量更新本组件的 state
componentWillMount/UNSAFE_componentWillMount[废弃]rendercomponentDidMount- 依赖 DOM 节点的操作可以放到这个方法中。这个方法通常还用于向服务端请求数据
更新阶段
组件被挂载到 DOM 后,组件的 props 或 state 改变会引起组件的更新。
props 引起的更新,本质上是由渲染该组件的父组件引起的(也就是当父组件的 render 方法被调用时,组件会发生更新过程),无论 props 是否改变,父组件 render 方法每一次调用,都会导致组件更新。
state 引起的组件更新,是通过 this.setState 修改组件的 state 触发的。componentWillReceiveProps/UNSAFE_componentWillReceiveProps[废弃]static getDerivedStateFromProps(props, state)[新增] :同上shouldComponentUpdate(nextProps,nextState):- 该方法决定组件是否继续执行更新过程。当该方法返回 true(默认值)时继续执行,返回 false 时停止执行
- 一般通过比较 nextProps、nextState 与组件当前的 props、state 来决定返回值。
- 该方法可用来减少不必要的渲染,从而优化组件的性能
componentWillUpdate/UNSAFE_componentWillUpdate[废弃]rendergetSnapshotBeforeUpdate(prevProps, prevState)[新增] :- 这个方法在
render之后,componentDidUpdate之前调用,表示之前的属性和之前的 state - 这个函数有一个返回值,会作为第三个参数传给
componentDidUpdate,如果你不想要返回值,可返回 null,不写的话控制台会 warning 此方法必须配合componentDidUpdate方法一起使用 - 此方法 为了取代之前的
componentWillUpdate
- 这个方法在
componentDidUpdate(prevProps, prevState, snapshot)- 当组件更新后,可以在此处对 DOM 进行操作。如果你对更新前后的 props 进行了比较,也可以选择在此处进行网络请求。(例如,当 props 未发生变化时,则不会执行网络请求)
卸载阶段
componentWillUnmount
组件复合
- 组件通过
props属性,传递给子组件数据。 - 相当于 VUE 的
slot,React 中用props.children表示组件内子内容。
PureComponent
纯组件
即 定制了 shouldComponentUpdate(nextProps,nextState){return nextState.xx!==this.state.xx || nextProps.xx!==this.props.xx
- 必须要用class 组件形式,⽽且要注意是浅比较,只比较一层,当 xx 是对象 重新赋值时会永远判断为相等导致子组件不会更新。可使用
immutable对象加速嵌套数据的比较 或通过解构赋值/Object.assign 给 state 第一层属性重新赋值新 obj - 其中定制的
shouldComponentUpdate(nextProps,nextState)将跳过所有子组件树的 prop 更新。因此,请确保所有子组件也都是纯组件,否则即使有自定义 shouldComponentUpdate 也会被 warning&忽视
export default class PureComponentPage1 extends PureComponent {}
函数组件
import React, { useState } from "react";
export default function HookPage(props) {
  // 声明⼀一个叫 “count” 的 state 变量量,初始化为0
  const [count, setCount] = useState(0);
  return (
    <div>
      <h3>HookPage</h3>
      <p>{count}</p>
      <button onClick={() => setCount(count + 1)}>add</button>
    </div>
  );
}
Hook 使用规则
- 只能在 函数最外层 调用 Hook。不要在循环、条件判断或者子函数中调⽤。
- 只能在 函数组件/自定义 Hook 中调用 Hook。不要在其他普通 JavaScript 函数中调用。
几个 Hook 方法
Hook 方法 & Class 组件生命周期关联 > 几个 Hook 方法详解 > useImperativeHandle & forwardRef 用法详解
useStateconst [state, setState] = useState(initialState)
返回一个 state,以及更新 state 的函数。setState(newstate | prevCount => prevCount - 1) 函数用于更新 state。它接收一个新的 state 值并将组件的一次重新渲染加入队列,如果新的 state 需要通过使用先前的 state 计算得出,那么可以将函数传递给 setState。该函数将接收先前的 state,并返回一个更新后的值useEffectuseEffect(() => { // 在 componentDidMount,以及 []内变量 更改时 componentDidUpdate 执行的内容 const subscription = props.source.subscribe(); return () => { // 相当于 componentWillUnmount 执行的内容 subscription.unsubscribe(); }; }, [props.source]);赋值给 useEffect 的函数会在组件渲染到屏幕之后执行与 componentDidMount 和 componentDidUpdate 相似
useContext
useContext(MyContext) 相当于 class 组件中的static contextType = MyContext或者MyContext.Consumerconst themes = { light: { foreground: "#000000", background: "#eeeeee", }, dark: { foreground: "#ffffff", background: "#222222", }, }; const ThemeContext = React.createContext(themes.light); function App() { return ( <ThemeContext.Provider value={themes.dark}> <Toolbar /> </ThemeContext.Provider> ); } function Toolbar(props) { return ( <div> <ThemedButton /> </div> ); } function ThemedButton() { const theme = useContext(ThemeContext); return ( <button style={{ background: theme.background, color: theme.foreground }}> I am styled by theme context! </button> ); }useReducerconst [state, dispatch] = useReducer(reducer, initialArg, init)
useState 的替代方案。它接收一个形如(state, action) => newState的 reducer,并返回当前的 state 以及与其配套的 dispatch 方法。例如 state 逻辑较复杂且包含多个子值,或者下一个 state 依赖于之前的 state 等const initialState = { count: 0 }; function reducer(state, action) { switch (action.type) { case "increment": return { count: state.count + 1 }; case "decrement": return { count: state.count - 1 }; default: throw new Error(); } } function Counter() { const [state, dispatch] = useReducer(reducer, initialState); return ( <> Count: {state.count} <button onClick={() => dispatch({ type: "decrement" })}>-</button> <button onClick={() => dispatch({ type: "increment" })}>+</button> </> ); }惰性创建初始 state,将 init 函数作为 useReducer 的第三个参数,初始 state 将被设置为
init(initialArg),这么做可以将用于计算 state 的逻辑提取到 reducer 外部,这也为将来对重置 state 的 action 做处理提供了便利function init(initialCount) { return { count: initialCount }; } function reducer(state, action) { switch (action.type) { case "increment": return { count: state.count + 1 }; case "decrement": return { count: state.count - 1 }; case "reset": return init(action.payload); default: throw new Error(); } } function Counter({ initialCount }) { const [state, dispatch] = useReducer(reducer, initialCount, init); return ( <> Count: {state.count} <button onClick={() => dispatch({ type: "reset", payload: initialCount })} > Reset </button> <button onClick={() => dispatch({ type: "decrement" })}>-</button> <button onClick={() => dispatch({ type: "increment" })}>+</button> </> ); }useMemoconst memoizedValue = useMemo(() => computeExpensiveValue(a, b), [a, b])
缓存计算数据的值
如下:在 a 和 b 的变量值不变的情况下,memoizedValue 的值不变。即:useMemo 函数的第一个入参函数不会被执行,从而达到节省计算量的目的useCallbackconst memoizedCallback = useCallback(() => { doSomething(a, b); }, [a, b]);缓存函数的引用
如下:在 a 和 b 的变量值不变的情况下,memoizedCallback 的引用不变。即:useCallback 的第一个入参函数会被缓存,从而达到渲染性能优化的目的
useCallback(fn, deps) 相当于 useMemo(() => fn, deps) 。 注意依赖项数组不不会作为参数传给“创建”函数。虽然从概念上来说它表现为:所有“创建”函数中引⽤用的 值都应该出现在依赖项数组中。未来编译器器会更更加智能,届时⾃自动创建数组将成为可能useRefconst refContainer = useRef(initialValue)
useRef 返回一个可变的 ref 对象,其 .current 属性被初始化为传入的参数(initialValue)。返回的 ref 对象在组件的整个生命周期内保持不变。function TextInputWithFocusButton() { const inputEl = useRef(null); const onButtonClick = () => { // `current` 指向已挂载到 DOM 上的文本输入元素 inputEl.current.focus(); }; return ( <> <input ref={inputEl} type="text" /> <button onClick={onButtonClick}>Focus the input</button> </> ); }请记住,当 ref 对象内容发生变化时,useRef 并不会通知你。变更 .current 属性不会引发组件重新渲染。如果想要在 React 绑定或解绑 DOM 节点的 ref 时运行某些代码,则需要使用回调 ref 来实现。
useImperativeHandleuseImperativeHandle(ref, createHandle, [deps])when to use this Hook
useImperativeHandle 应当与 forwardRef 一起使用:
forwardRef 理解成把 useRef 实例的*指向ref={xxRef}*向下传递给某个元素实例,目的是让父组件可以操控子组件内元素
而用了 useImperativeHandle 之后,useImperativeHandle 将拿到 forwardRef 传递过来的 ref,对该 ref.current 的具体实例值进行操控,import React, { useRef, useImperativeHandle, forwardRef } from "react"; function Child(props, parentRef) { // 子组件内部自己创建 ref let focusRef = useRef(); let inputRef = useRef(); // 这个函数会返回一个对象 // 该对象会作为父组件 current 属性的值 // 通过这种方式,父组件可以操作子组件中的多个 ref useImperativeHandle(parentRef, () => ({ focusRef, inputRef, name: "计数器", focus() { focusRef.current.focus(); }, changeText(text) { inputRef.current.value = text; }, })); return ( <> <input ref={focusRef} /> <input ref={inputRef} /> {/* <input ref={parentRef} type="text"/> */} </> ); } const FancyInputEle = forwardRef(Child); export default function Home(props) { const parentRef = useRef("s"); return ( <div> <button onClick={() => { parentRef.current.focus(); console.log(parentRef.current.focusRef.current.value); // parentRef.current.addNumber(666);// 因为子组件中没有定义这个属性,实现了保护,所以这里的代码无效 parentRef.current.changeText("sd"); console.log(parentRef.current.name); }} > focus </button> <button onClick={() => console.log(parentRef)}>value</button> <FancyInputEle ref={parentRef}></FancyInputEle> </div> ); }- 写在
forwardRef内部,限定子组件的哪些实例值可以被父组件暴漏获取/哪些属性方法可以被父组件调用,避免使用 ref 这样的命令式代码&&重定义事件方法使用 - 父组件可以操作子组件中的多个 ref
- 在大多数情况下,应当避免使用 ref 这样的命令式代码。
- 写在
useLayoutEffect
其函数签名与 useEffect 相同,但它会在所有的 DOM 变更之后同步调用 effect。可以使用它来读取 DOM 布局并同步触发重渲染。在浏览器执行绘制之前,有点类似componentWillMount,useLayoutEffect 内部的更新计划将被同步刷新。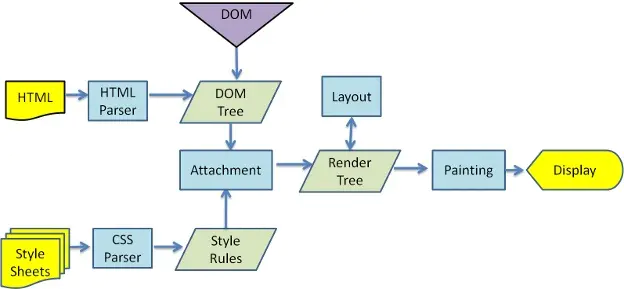
详情参考- useEffect 在全部渲染完毕后才会执行
- useLayoutEffect 会在 浏览器 layout 之后,painting 之前执行
- 其函数签名与 useEffect 相同,但它会在所有的 DOM 变更之后同步调用 effect
- 可以使用它来读取 DOM 布局并同步触发重渲染
- 在浏览器执行绘制之前 useLayoutEffect 内部的更新计划将被同步刷新
- 尽可能使用标准的 useEffect 以避免阻塞视图更新
useDebugValueuseDebugValue(value, (value) => value.Fn())
在自定义 hook内部设置,可用于在 React 开发者工具中显示自定义 hook 的标签function useFriendStatus(friendID) { const [isOnline, setIsOnline] = useState(null); // ... // 在开发者工具中的这个 Hook 旁边显示标签 // e.g. "FriendStatus: Online" useDebugValue(isOnline ? "Online" : "Offline"); return isOnline; }接受一个格式化函数作为可选的第二个参数,该函数只有在 Hook 被检查时才会被调用。它接受 debug 值作为参数,并且会返回一个格式化的显示值。
例useDebugValue(date, date => date.toDateString())
自定义 Hook
自定义 Hook 是⼀个函数,其名称必须以 “use” 开头,函数内部可以调⽤其他的 Hook。
其实就是个封装的函数
有时候我们会想要在组件之间重用一些状态逻辑。⽬前为止,有两种主流方案来解决这个问题:⾼阶组件和 render props。⾃定义 Hook 可以让你在不增加组件的情况下达到同样的目的。
function useClock() {
  const [date, setDate] = useState(new Date());
  useEffect(() => {
    console.log("date effect"); //只需要在didMount时候执行就可以了
    const timer = setInterval(() => {
      setDate(new Date());
    }, 1000); //清除定时器,类似willUnmount
    return () => clearInterval(timer);
  }, []);
  return date;
}
React-Native 的自定义 hook
import React, { useState, useEffect } from "react";
import { Linking, StyleSheet, Text, View } from "react-native";

const useMount = (func) => useEffect(() => func(), []);

const useInitialURL = () => {
  const [url, setUrl] = useState(null);
  const [processing, setProcessing] = useState(true);

  useMount(() => {
    const getUrlAsync = async () => {
      // Get the deep link used to open the app
      const initialUrl = await Linking.getInitialURL();

      // The setTimeout is just for testing purpose
      setTimeout(() => {
        setUrl(initialUrl);
        setProcessing(false);
      }, 1000);
    };

    getUrlAsync();
  });

  return { url, processing };
};

const App = () => {
  const { url: initialUrl, processing } = useInitialURL();

  return (
    <View style={styles.container}>
      <Text>
        {processing
          ? `Processing the initial url from a deep link`
          : `The deep link is: ${initialUrl || "None"}`}
      </Text>
    </View>
  );
};

const styles = StyleSheet.create({
  container: { flex: 1, justifyContent: "center", alignItems: "center" },
});

export default App;
React-router
react-router 包含 3 个库,react-router、react-router-dom 和 react-router-native。根据应⽤运⾏的环境选择安装 react-router-dom(在浏览器器中使用)或 react-router-native(在 rn 中使用)。react-router-dom 和 react-router-native 都依赖 react-router,所以在安装时,react-router 也会自动安装,创建 web 应⽤npm install --save react-router-dom
基本组件
react-router 中奉行⼀切皆组件的思想,路由器-Router、链接-Link、路由-Route、独占-Switch、重定向-Redirect 都以组件形式存在
import React, { Component } from "react";
import { BrowserRouter as Router, Route, Link,Switch } from "react-router-dom";
export default class RouterPage extends Component {
  render() {
    return (
      <div>
         <h3>RouterPage</h3>
         <Router>
            <Link to="/">⾸首⻚页</Link>
            <Link to="/user">⽤用户中⼼心</Link>
            {/* 根路路由要添加exact,实现精确匹配 */}
            <Switch>
               <Route
                  exact
                  path="/"
                  component={HomePage}
                  //children={() => <div>children</div>}
                  //render={() => <div>render</div>}
               />
               <Route path="/user" component={UserPage} />
               <Route component={Page404}></Route>
            </Switch>
         </Router>
      </div>
); }
}
class HomePage extends Component {
  render() {
    return (
      <div>
        <h3>HomePage</h3>
      </div>
); }
}
class UserPage extends Component {
  render() {
    return (
      <div>
        <h3>UserPage</h3>
      </div>
 );
class Page404 extends Component {
  render() {
    return (
      <div>
        <h3>404</h3>
      </div>
 );
Route 渲染内容的三种方式
Route 渲染方式互斥,优先级:children>component>render
component={componentName}
只在当 document.location 匹配的时候渲染render={()=>{}}
只在当 document.location 匹配的时候渲染children:{()=>{}}
不管 document.location 是否匹配都会被渲染。工作方法与 render 完全一样
React-redux
更新重点
context
- xxContext.Provider [& xxContext.Consumer] Provider 的 value 值要提升到父节点的 state 变量
- 子孙组件
- class 组件: static contextType = xxContext ; const {obj} = this.context
- fun 组件:const {obj} = useContext(xxContext)
- 两种组件都可以用:
<xxConsumer>{ctx=><div>内部接收格式必须是函数</div>}</xxConsumer>
HOC 高阶组件
- 参数是组件,返回一个新的组件,本质上是个函数
- 装饰器 @xx 只能用于 class 组件
- 不要在 render 中(的 return 前)使用 HOC
实现 fork 版 rc-field-form
- Form - FieldContext, FieldContext.Provider; forwardRef & useImperativeHandle;
- Field
- useForm
react-dom - Portal 传送门
reducer
import {createStore} from 'redux'&createStore(reducerFun)- store.getState()
- store.dispatch({type: ‘add’,payload: 100})
- sotre.subscribe(()=>{this.forceUpdate()})
redux 中间件
redux 只是个纯粹的状态管理器,dispatch()参数只接收对象,默认只支持同步。为了实现异步需要中间件的支持createStore(reducerFn, applyMiddleware(中间件1,...中间件n))
tips: 函数组件中怎么实现 forceUpdate:
const [ignored, forceUpdate] = useReducer(x => x + 1, 0)
在 function 组件中(class 组件 setState 不会比对前后 state),因为如果前后两次的值相同,useState和useReducer都会放弃更新。而通常,不应该在 react 中修改本地 state,作为一条出路,可以用一个增长的计数器来在 state 没变的时候依然强制一次重新渲染
为什么函数组件需要缓存 useCallback,useMemo。
函数式编程的优点:自定义 hook 逻辑复用。与 UI 层脱离
Tips
React.Fragment
https://reactjs.org/docs/fragments.html
react 的父子通信
https://segmentfault.com/a/1190000021200567
https://www.shuzhiduo.com/A/KE5Q3Pr0zL/
react 发布和订阅
on subcribe
及 与 vue 区别
使用 JS 及 React Hook 时需要注意过时闭包的坑(文中有解决方法)
https://segmentfault.com/a/1190000020805789
useEffect 中,实现 willUnmount 生命周期,当有一种情况里面包含 state 时,需要拿到最新 state 值才执行的话:
可以使用 useRef .current,这个值会绕过 useEffect 的 Capture Value 特性比较 React hooks 与 React class component 的性能:
理论上其实就是比较 闭包与类 class 的性能,其实在现在浏览器两个差别不大。
如果真要吹毛求疵,hooks 可能在某些方面还有自己的优点:hooks 不需要像 class 组件一样,创建类实例、绑定事件处理器等。
hooks 会让你的代码结构更加简单,比如没有 hooks 之前,我们可可能更多的使用 render props、HOC、context 模式、容器组件模式等,容易导致你组件结构复杂或者嵌套,这势必对渲染有影响。
很多人认为 hooks 性能差, 是因为每次渲染或者更新都需要构建一个新的函数上下文来执行。
事实上也是这个样子,不过 React 将性能优化的方法交给了开发者来决定。比如 useCallbackuseMemo
hook 相比于 class 解决的问题
- 函数组件没有自己的 state,即无状态,都是通过 props 获取父组件的状态,hooks 提供了 useState;不能监听生命周期 -> 有了 useEffect 聚合多个生命周期
- hooks 写法上简洁,相关业务逻辑更聚合,使用 class 组件经常会出现一个功能出现在两个生命周期函数内的情况
- 计算的越少,缓存的越多,性能越好。
- 纯函数 确定输入一定会确定输出,有很多优化手段,比如:虽然 fc 相比 class 每次渲染或者更新都需要构建一个新的函数上下文来执行,但是多用 useMemo,useCallback 可优化;
- 无副作用所以线程安全,可以使用多核(webWorker)并行计算。
- class 组件逻辑难以复用 需要使用 HOC,render props
想要在 class component 外部访问到 setState(ReactDispatcher),
class 需要利用回调函数,或者是发布订阅,比如加个 Redux,通过调用 store dispatch 间接调用到 setState。
而 hooks 可以使用自定义 hooks 代替 render props,如例子
所以,
class 组件的画风就是@connect、mapXXXToProps、subscribe、dispatch 还有各种生命周期钩子;
函数组件清一色的 useState,useReducer,useEffect,useXXX,setState
规范 & Reference
使用 JSX 隐式地依赖当前环境下有 React 这一对象,但在源码上并没有显式使用,这种情况下添加 import React from ‘react’;会造成一个没有使用的变量存在。
使用 babel-plugin-react-require 插件可以很好地解决这一问题,因此无需显式地编写 import React from ‘react’;这一语句。