导图
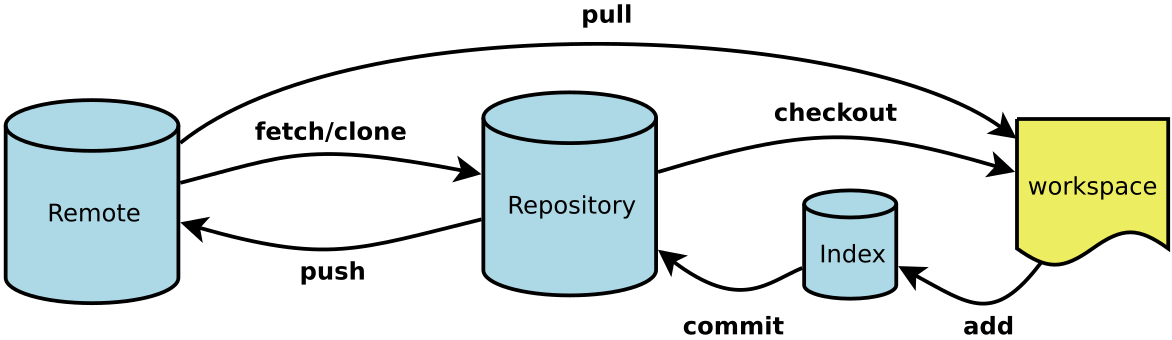
- Workspace:工作区
- Index / Stage:暂存区
- Repository:仓库区(或本地仓库)
- Remote:远程仓库
- HEAD:理解为 当前分支的最近一次 commit
Base
初始化
init
# 在当前目录新建一个Git代码库
$ git init
# 在当前目录新创建一个名为repo且只包含 .git 子文件夹的空目录,将其初始化为Git代码库
$ git init [repo]
# 在服务器机器上创建裸仓库(因为服务器不需要对工作区直接操作,纯/裸仓库即普通仓库的.git文件夹)
mkdir robbin_site.git + cd robbin_site.git + git --bare init
指定远程仓库
remote
#查看远程库的信息
$ git remote
#查看所有远程库地址和名称
$ git remote –v
# 查看某个远程服务器仓库状态
$ git remote show [remote-repo]
# 增加一个新的远程仓库,并命名
$ git remote add [remote-repo] [git@github:robbin/robbin_site.git]
# 设置远程仓库地址(用于修改远程仓库地址)
$ git remote set-url [remote-repo] [git@github.com:robbin/robbin_site.git]
# 设置远程仓库的HEAD指向master分支
$ git remote set-head [remote-repo] [master]
# 删除远程仓库
$ git remote rm [remote-repo]
拉数据
clone
# 根据[url]从远程仓库中克隆下载一个项目和它的整个代码历史
$ git clone [https://github.com/Hojondo/barerepo.git]
# 用带版本的项目创建纯版裸仓库,不包括工作区直接就是版本库的内容
$ git clone --bare [remote-bare-repo] [local-bare-repo.git]
# 将纯仓库上传到服务器上
scp -r my_project.git git@git.csdn.net:~
fetch
# 抓取下载远程仓库更新,加下一条指令等同于git pull
# 与git pull相比git fetch相当于是从远程获取最新版本到本地,但不会自动merge
$ git fetch [remote-repo]
$ git merge [remote-repo]/master    # 将远程主分支合并到本地当前分支
pull
# 抓取远程仓库所有分支更新并合并到本地
$ git pull
# 取回远程仓库的某分支变化,并与当前本地分支合并
$ git pull [remote-repo] [remote-branch]
# 抓取远程仓库所有分支更新并合并到本地,不要快进合并
$ git pull --no-ff
推数据
push
# push所有分支(所有已经设置好upstream的本地分支)
$ git push
# 客户端首次提交(没有master时)需要加-u
$ git push –u [remote-repo] master
# 将本地某分支推到远程分支 / 创建远程分支(远程没有对应分支时)
$ git push [remote-repo] [local-branch]:[remote-branch]
$ git push [remote-repo] branchName # 当本地远程分支名字相同时
# 强行推送当前分支到远程仓库,即使有冲突
$ git push [remote-repo] --force
# 推送所有分支到远程仓库
$ git push [remote-repo] --all
# 先删除本地分支,然后再push删除远程分支
$ git branch -d [local-branch]
$ git push [remote-repo] :[remote_branch]

# 删除远程tag
$ git push [remote-repo] :refs/tags/[tagName]
# 提交指定tag
$ git push [remote-repo] [tag]
# 提交所有tag
$ git push [remote-repo] --tags
submodule
配置 gitconfig
用户的配置文件~/.gitconfig
# 显示当前的Git配置,列举所有配置
$ git config --list
# 编辑Git配置文件
$ git config -e [--global]

# 设置提交代码时的用户信息
git config --global user.name "xxx"
git config --global user.email "xxxxxx@gmail.com"

# git status等命令自动着色
git config --global color.ui true
git config --global color.status auto
git config --global color.diff auto
git config --global color.branch auto
git config --global color.interactive auto
# 配置别名,co 配为checkout 别名,等等etc...
git config --global alias.co checkout
git config --global alias.ci commit
git config --global alias.st status
git config --global alias.br branch

# 设置Editor使用textmate
git config --global core.editor "mate -w"

# remove  proxy configuration on git
git config --global --unset https.proxy
常用命令
分支和合并
branch
# 列出所有本地分支
$ git branch
# 列出所有远程分支
$ git branch -r
# 列出所有本地分支和远程分支
$ git branch -a
# 查看各个分支最后提交信息
$ git branch -v
# 移动/重命名分支及其对应的日志
$ git branch -m oldName newName
# 查看已经被合并到当前分支的分支
$ git branch --merged
# 查看尚未被合并到当前分支的分支
$ git branch --no-merged

# 建立追踪关系,在现已有本地分支与指定的远程分支之间
$ git branch --set-upstream-to [local-branch] [remote-branch]
# 建立追踪关系,在当前激活本地分支与指定的远程分支之间
$ git branch --set-upstream-to [remote-branch]

# 新建一个分支,但依然停留在当前分支
$ git branch [local-branch]
# 新建一个分支,指向指定commit
$ git branch [local-branch] [commit-id]
# 新建一个分支,与指定的远程分支建立追踪关系
$ git branch --track [local-branch] [remote-branch]

# 删除本地分支
$ git branch -d [local-branch]
# 强制删除分支 (未被合并的分支被删除时 需要强制)
$ git branch -D [local-branch]
# 删除远程分支
$ git push [remote-repo] --delete [remote-branch]
$ git push [remote-repo] :[remote-branch]
$ git branch -dr [remote-branch]
checkout
# 新建一个分支,并切换到该分支(-b等同于branch命令)
$ git checkout -b [local-branch]
# 切换到指定分支,并更新工作区
$ git checkout [local-branch]
# 切换到上一个分支
$ git checkout -
# 基于branch创建新的new_branch
$ git checkout -b [new_branch] [branch]
# 跟踪某个远程分支创建相应的本地分支
$ git checkout --track [remote-repo]/[remote-branch]
# 基于远程分支创建本地分支,功能同上
$ git checkout -b [local_branch] [remote-repo]/[remote-branch]
# 把某次历史提交记录checkout出来,但无分支信息,切换到其他分支会自动删除
$ git checkout  [commit-id]
# 把某次历史提交记录checkout出来,创建成一个分支
$ git checkout  [commit-id] -b [new_branch]
# 依据需要合并的最后一条 commit 创建新分支
$ git checkout -b newbranch [last_commit]
# 新建一个分支,指向某个tag
$ git checkout -b [branch] [tag]

# 撤销工作区修改,恢复暂存区的所有文件到工作区
$ git checkout .
# 撤销xx文件修改,在工作区的修改全部撤销到暂存区状态
$ git checkout -- xx
# 恢复暂存区的指定文件到工作区
$ git checkout [file]
# 撤销指定文件到指定版本,恢复某个commit的指定文件到暂存区和工作区
$ git checkout [commit-id] [/path/to/file]
merge
# 合并指定分支到当前分支
$ git merge [branch]
# 将远程主分支合并到本地当前分支
$ git merge [remote-branch]/[local-branch]

# 不要Fast-Foward合并,这样可以生成merge提交
$ git merge [branch] --no-ff
# 选择一个其它分支的某一次提交commit,合并进当前分支(合并其它分支一系列提交,后缀为 first_commit ~ last_commit)
$ git cherry-pick [commit-id]

# 将master rebase到branch,等同于:
# git checkout   [branch] + git rebase master + git checkout  master + git merge [branch]
$ git rebase [master] [branch]
# 从新分支中需要合并的第一条 commit 开始合并
$ git rebase --onto master [first_commit]^
stash
#暂存当前分支的工作区,恢复现场后可继续工作
$ git stash
#查看暂存文件队列列表
$ git stash list
#恢复暂存内容,暂存区不删除
$ git stash apply [stash@{2}]
#删除暂存文件
$ git stash drop [stash@{0}]
#恢复并删除文件
$ git stash pop [stash@{2}]
tag
# 列出所有tag
$ git tag
# 新建一个tag在当前commit
$ git tag [tag]
# 新建一个tag在指定commit
$ git tag [tag] [commit-id]
# 删除本地tag
$ git tag -d [tag]
# 删除远程tag
$ git push origin :refs/tags/[tagName]
# 查看tag信息
$ git show [tag]
# 提交指定tag
$ git push [remote-repo] [tag]
# 提交所有tag
$ git push [remote-repo] --tags
# 新建一个分支,指向某个tag
$ git checkout -b [branch] [tag]
基本快照操作
add
# 添加指定文件到暂存区
$ git add [file1] [file2] ...
# 添加指定目录到暂存区,包括子目录
$ git add [dir]
# 添加当前目录的所有文件到暂存区
$ git add .
# 添加每个变化前,都会要求确认
# 对于同一个文件的多处变化,可以实现分次提交
$ git add -p
rm
# 删除工作区文件,并且将这次删除放入暂存区
$ git rm [file1] [file2] ...
# 停止追踪指定文件,但该文件会保留在工作区,即 从远程版本库中删除文件,但不删除本地文件
$ git rm --cached [file]
# 改名文件,并且将这个改名放入暂存区
$ git mv [file-original] [file-renamed]
commit
# 提交单个文件
$ git commit  [file]
# 提交暂存区的文件到仓库区
$ git commit –m “description”
# 提交工作区自上次commit之后的变化,直接到仓库区,等同执行git add、 git rm及git commit
$ git commit -a
$ git commit -am "some comments"
# 撤销最后一次提交记录,重新提交;如果代码没有任何新变化,则用来改写上一次commit的提交信息
$ git commit --amend 'msg'
reset
重置 HEAD(当前分支的版本顶端)到另外一个 commit。
reset 和 revert 的区别详解
其实就是--soft 、--mixed 以及--hard 是三个恢复等级。
- 使用
--soft就仅仅将 HEAD 指针恢复,已经 add 的缓存以及工作空间的所有东西都不变。 - 如果使用
--mixed(默认),就将 HEAD 恢复掉,已经 add 的缓存也会丢失掉,工作空间的代码什么的是不变的。 - 如果使用
--hard,那么一切就全都恢复了,HEAD 变,aad 的缓存消失,代码什么的也恢复到以前状态。
# 从暂存区恢复某一文件,重置HEAD到另外一个commit,并且重置index以便和HEAD相匹配,working copy不会被更改
$ git reset [file]
# 重置当前分支的指针为指定commit,同时重置暂存区,但工作区不变
$ git reset [commit]
# 从暂存区恢复所有文件
$ git reset -- .
# 重置当前分支的HEAD为上一次commit,重置暂存区与工作区
$ git reset --hard 或 $ git reset  –hard HEAD^/HEAD~
# 重置当前分支的HEAD为指定commit,同时重置暂存区和工作区,与指定commit一致
$ git reset --hard [commit]
# 重置当前HEAD为指定commit,但保持暂存区和工作区不变,即 取消最后一次commit
$ git reset --keep [commit]
status
$ git status #查看仓库状态,显示有变更的文件
审核&比较
show
# 显示某次提交的元数据和内容变化
$ git show [commit-id]
# 显示某次提交发生变化的文件名
$ git show --name-only [commit-id]
# 显示某次提交时,某个文件的内容
$ git show [commit]:[filename]
log
# 查看(文件)提交历史记录
$ git log   (file)
# 查看每次详细修改内容的diff
$ git log -p [file]
# 查看最近两次详细修改内容的diff
$ git log -p -2
# 查看提交统计信息,显示简要的增改行数统计
$ git log --stat
# 同上,用'log'格式输出
$ git log -g
# 搜索包含name的log
$ git log -- grep "name"
# 查看指定ID记录,-L [?startLine],[?endLine]:fileName显示一行
$ git log record-ID  -L 2,3:file2.txt
# 搜索提交历史,根据关键词
$ git log -S [keyword-string]
# 显示某个commit之后的所有变动,按 每个commit占据一行 的格式
$ git log [tag] HEAD --pretty=format:%s
# 显示过去5次提交
$ git log -5 --pretty --oneline 或 $ git log -5 --pretty=oneline
# 显示某个commit之后的所有变动,筛选"提交说明"中符合关键字搜索条件的历史记录
$ git log [tag] HEAD --grep feature
# 显示某个文件的版本历史,包括文件改名前的历史
$ git log --follow [file]
$ git whatchanged [file]
shortlog
汇总 git log 的输出
# 显示所有提交过的用户,-n:按提交次数排序,-s:省略commit注释
$ git shortlog -sn
diff
# 比较当前文件和暂存区文件差异
$ git diff [file]
# 比较所有文件,显示暂存区和工作区的差异
$ git diff
# 比较本地和远端仓库
$ git diff master..Andylee-Github/master
# 比较两次提交之间的差异
$ git diff [commit-id1] [commit-id2]
# 比较分支
$ git diff [branch1]..[branch2]
# 比较暂存区和版本库差异
$ git diff --staged
# 比较暂存区和版本库即上一个commit的差异
$ git diff --cached
# 仅仅比较统计信息
$ git diff --stat
# 显示工作区与当前分支最新commit之间的差异
$ git diff HEAD
# 显示今天你做了哪些改动
$ git diff --shortstat "@{0 day ago}"
补丁 Patch
diff
# 生成补丁
$ git diff > ../sync.patch
cherry-pick
apply
# 打补丁
$ git apply ../sync.patch
# 测试补丁能否成功
$ git apply --check ../sync.patch
revert
reset 和 revert 的区别详解
git revert 是用一次新的 commit 来回滚之前的 commit,git reset 是直接删除指定的 commit;
git reset 是把 HEAD 向后移动了一下,而 git revert 是 HEAD 继续前进,只是新的 commit 的内容和要 revert 的内容正好相反,能够抵消要被 revert 的内容。
git revert [$id]    # 恢复某次提交的状态,恢复动作本身也创建了一次提交对象
git revert HEAD     # 恢复最后一次提交的状态
git revert [commit]  # 撤销提交
git revert --continue # 处理完后,重新提交

# 新建一个commit,用来撤销指定commit
# 后者的所有变化都将被前者抵消,并且应用到当前分支
$ git revert [commit]
rebase
merge 和 rebase 的区别,rebase 的详解
rebase 用于合并多次提交记录
# 合并最近的4次提交记录
$ git rebase -i HEAD~4
调试 Debug
blame
# 显示指定文件是什么人在什么时间修改过
$ git blame [file]
grep
管理
archive
bundle
clean
…